Intro Course Lesson 2
What Kills Photos?
How to prevent blurred photos
What Kills Photos?
Blur kills more photos than anything else.
Lets work on preventing blurred images.
Blur is the biggest issue with your photos. We have all had the experience of taking a photo that looks great, only to get the photo on the computer and only then realize its blurry.
Blur is caused when the camera moves while taking photos. Pushing the trigger moves the camera. Holding the camera incorrectly causes the camera to move. Lets solve these problems.
Holding the camera properly.
- Hold the camera in your left hand.
- Thumb and forefinger on the zoom ring
- Both elbows in tight to your body
- Eyepiece pressed against your eyebrow
- Wrap the strap around your wrist
It doesn’t matter which eye you use to look through the viewfinder. Every person has a dominant eye. Don’t fight it.
Avoid using the ‘Live View’ mode unless you are using a tripod or resting the camera on a stable surface.
NOTE: For non-DSLR cameras such as Nikon Coolpix, Canon Powershot or any camera that does not have an eyepiece or viewfinder to look through. You will need to use the live-view display while shooting. This means that this lesson on stabilizing the camera is ultra important. You will need to work hard to ensure that the camera is not moving and you will need to get creative in preventing any movement.
[Best_Wordpress_Gallery id=”6″ gal_title=”Point and Shoot cameras”]
Pro Tip:
Use anything you can to stabilize yourself and the camera. I have a 'power stance' with my feet shoulder width apart. It looks goofy but the photos look great!
Stabilizing the camera
Anything you can do to support the camera will improve the picture quality.
- Use a tripod
- Rest your elbows on a table, fence, rock…
- Lean against a wall
- Rest the camera on the ground, a table, really anything that will provide support
- Shoot while you exhale
Exercise: Rest your elbows on your table or desk. Rest the camera in your left hand, palm up, thumb and forefinger on the zoom ring on the lens. Press the rubber pad of the eyepiece against your eyebrow. (Hint: You should be able to see the display information across the bottom of the viewfinder while looking through the eyepiece.)
Lens selection and blurred images
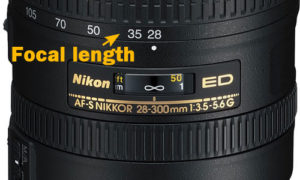
When you shoot with a ‘long’ lens, you risk blurred images. If you use a wide angle lens, shutter speed is less of a concern. When the light is low and my shutter speeds are slow, I will often opt for a lens that is wider so that I can ‘get away with’ slower shutter speeds.
2 times the focal length = minimum shutter speed.
A good rule of thumb for hand holding the camera is:
2X focal length = minimum Shutter Speed for hand-holding the camera without a tripod.
If you are shooting with a lens that has a focal length of 50mm, you will need a minimum shutter speed of 1/100th of a second shutter to get good, blur free photos. If the lens is a 300mm focal length, then the minimum shutter speed required to get crisp images is 1/640th of a second.
Exercise: When shooting in portrait orientation (camera tilted on its side) we still support the camera with the left hand and this means the right elbow will end up being raised into the air. Take a few shots in portrait orientation and a few in landscape orientation.


