How to: Motion Blur and Panning
Create an interesting blur effect
Panning and Motion Blur
In photography, conveying motion is one of the most challenging tasks due to the very nature of a stills photograph. You are essentially freezing a specific moment in time rather than capturing the whole of the sequence from which this moment originates. When set to fast shutter speeds, our cameras can break down whole events into precise frames that tell a story in hundredths and thousands of a second.
The issue with telling a story in hundredths and thousands of a second is that, at such fast shutter speeds, the subject is perfectly frozen in place – so the image loses all sense of movement. To counter this, a photographer can employ two techniques known as motion blur and panning with motion blur.
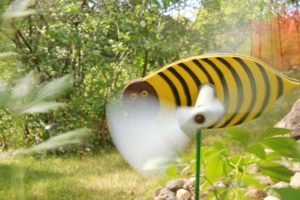
MOTION BLUR refers to the apparent streaking of moving objects in a photograph that occurs when part of the image being recorded changes during the exposure. This streaking may occur on an object that is moving within in the frame or because of a user-induced camera shake. The longer the shutter speed, the more apparent the motion blur.
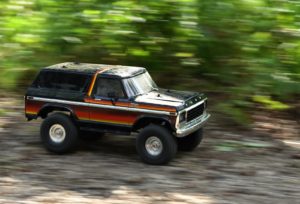 PANNING refers to a technique where you follow a subject with the camera while keeping it in the same position in the viewfinder as it moves along a plane of motion. The subject can be anything from a runner on a racetrack to a flying bird, and this technique is most effective when your subject is moving across a horizontal plane. Panning with motion blur is a combination of the two techniques, where the photographer pans along with the subject while utilizing a slow shutter speed. This effectively combines both techniques to produce an image where part of the subject is sharp while the rest of the image is blurred and streaked, thus creating the visual sensation of movement.
What Is Motion Blur?
When you push the shutter release button to take a photo, any object in the frame that moves faster than the set shutter speed will look smeared along the direction of its relative motion.
This smearing occurs on an object that moves within the frame, or on a static subject when the camera moves during the exposure. The latter of these options is a useful technique in and of itself for creating a sense of motion in an otherwise motionless scene.
With the camera completely still (on a tripod or bean bag), motion blur can be used to create a juxtaposition between the moving and unmoving elements of a scene. While the shutter is open, anything that doesn’t move for the duration of your exposure will remain sharp and in focus while the elements of the scene that moved during the exposure are increasingly blurred depending on how fast they move.
[Best_Wordpress_Gallery id=”60″ gal_title=”Motion Blur”]
What is Panning?
Panning refers to a technique where you follow a subject with the camera while keeping it in the same position in the viewfinder as it moves along a plane of motion.
First, keep in mind that panning applies both to photos with motion blur and photos without. We pan with our subjects all the time in order to track them across the frame, often with fast shutter speeds to freeze motion completely. The beauty of panning is that the final image is highly dependent on the shutter speed set by the user, with slower shutter speeds giving the motion blur effect so often associated with the technique.
To correctly pan, a photographer must match the speed of the subject’s movement with the movement of the camera. Fluid camera movement is essential to achieve the background blur.
[Best_Wordpress_Gallery id=”61″ gal_title=”Panning”]
NOTE: The farther away your subject is, the slower it appears to be moving, and the easier it’ll be to follow during your pan. But if it is too far away, you lose the distinction between it and its surroundings, lessening the visual effect of the motion. Also, the closer it is to the background, the more pronounced the appearance of speed and movement will be. As a rule of thumb, when framing your image, I recommend ensuring that your subject is large enough to take up at least 25 to 35 percent of the frame.
NOTE: Probably the first question I received while teaching the panning technique is “what shutter speed I should use?” Slow shutter speeds result in a more dramatic blur effect, while faster shutter speeds retain greater sharpness with fewer parts of the image blurred. I would recommend starting at 1/30th or 1/15th of a second and moving up or down from there.
Some additional tips
-
- Animals that are running make it easier to use faster shutter speeds, and in these instances, I typically use speeds from 1/15th to 1/30th of a second. Due to their speed, with birds in flight, I typically use speeds of 1/40th to 1/80th second. Of course, the choice of these speeds is dependent on what sort of effect you desire, and I have found that nothing beats experience in the field in knowing which shutter speeds work best.
- With panning, you are striving to have one or more elements of the image remain relatively sharp even as most of the image becomes blurred.
- The most challenging part of getting a panning shot right is to learn to swing the camera and lens smoothly as you match the subject’s movement.
- When panning while hand-holding the camera, It is critical to grip the camera as steady as you can, with elbows and arms tucked into the body and a slight flex of the knees.
EXERCISE: Use aperture priority exposure mode. Set the ISO to 100. Set the Aperture to f8. The camera will pick the shutter speed. As you look through the viewfinder and press the shutter release button halfway, you will see that the shutter speed will be relatively slow. Press the shutter as you are moving the camera from side to side and you will see that in the results, the image will appear streaky.
EXERCISE 2: With the camera on a tripod or otherwise stabilized on a table or bean bag, use the same settings as the first exercise, but now have someone walk through the image. You will notice that the entire room is sharp and not blurry, but the subject who is walking is blurred due to their movement.
Good luck.